Twitter/Instagram/Pinterest

Instagram

Sunday, 14 December 2014

Christmas Yarn Baubles

 
Like every good crafter, each year I vow to make my own Christmas decorations and each year I fail. Miserably. 

Not this year though! Even though I one day want to make cute fairisle baubles, these were quick and easy; and with no bias at all, pretty cute!

I made these at a recent WI meet up (Women's Institute for those not from the UK). Once a month we have a crafty night, separate from the main monthly meeting and try and cover different topics. Last month was Papercraft, the month before Pumpkin Carving and before that I led a Crochet Granny Square evening. This month was all about baubles. There were different methods such as layering felt to make a acorn looking one, a patchwork one or yarn. Obviously I was going to do the yarn one (mainly because I didn't have any material or felt for the first two types!). 

It was easy. Pin the yarn into a polystyrene ball (easily available from eBay or a craft shop like HobbyCraft). Wrap the yarn around the ball until
You can't see the polystyrene anymore and then pin the yarn again! Super easy! If you need a quick fix for some missing yarn on the tree then this is so handy. I doubled up the yarn to make multicoloured ones. Some in cream/red, some in cream/gold. 

Next year I'm definitely going to have some fairisle ones! (Don't hold your breath though!)


Sunday, 6 July 2014

Wippity Wips

A bit slow on the update front, but I'm making a mid-year resolution to write more!

At the moment I have two WIP's on the go: a baby blanket and my beloved Santorini by Rowan!

Baby Blanket


This is going pretty well.  I have FOUR friends all expecting before the end of the year and so I've been busy planning and hoarding for gifts for them all!  For this current blanket, the recipient isn't finding out the sex of the baby, I decided to go for unisex baby colours to make a crochet ripple blanket.  I showed my family when they were round for dinner; obviously my parents were all like "wow, that's so good, well done!"  My brother on the other hand who is very hard to impress turned to look at it, and no lie, his exact words were "Oh my God, that's amazing, that's really really good! I wasn't even going to look at it when you said you were going to show us, that's amazing!"  I do love my brother!

Santorini


Oh. Em. Gee.  I had to knit the biggest piece of stockinette that I've ever had to do in my life! (Other than my rug, but that really doesn't count as the stitches were huge so didn't come to that much).  For the back piece of this sweater, I had 120 stitches in a DK yarn squeezed onto a pair of straight needles!  After 3 weeks of hard graft I finally finished it!  I'm currently on the first sleeve.  Only one more sleeve and the front piece left to do.  Sounds simple other than that 12 colour bit of intarsia that I'll have to do!

That's it for now!


Saturday, 24 May 2014

Baby Cardigan & Trousers


I made this little outfit for a friend of mine who recently had a bubba (well, obviously, would be weird if she didn't have one or wasn't even expecting!).  She'd seen some pics on FB of some other knitting and crochet items and asked if I could make an outfit for her little boy.

I set about researching outfits on the best site ever, Ravelry!  I tried out a few search terms before realising it was better looking for a cardigan and bottoms separately and picking ones that matched.  By coincidence, the two I settled on were both by Drops!  I picked the cardigan as I wanted to practice my colourwork - I've only ever done swatches of fairisle before so thought I'd try my hand at an actual item.  As for the trousers, they were the simplest looking ones that I liked, and I especially adored the ribbing detail on the side of the legs.

The yarn I decided on Rico Design Baby Cotton Soft DK, a cotton/acrylic mix.  I chose this for two reasons: 1. the material mix and 2. because it had the colours that I wanted to use!  It is a gorgeously soft yarn, however it probably wasn't the best choice for this project.  Hard to describe, but it didn't leave a nice fluffy texture like I wanted it to.  But still, it had a lovely sheen and was wonderful to work with.  It would be perfect for any summer clothing as it's quite light, would definitely use it again for a better suited project.

It started of pretty well...


The first mistake was not keeping track of the button holes!! These were worked in at the same time as going up the body - if you look closely the gap between the second and third button is huge!  It took me AGES to figure out this was a bottom up pattern as I'm such an idiot!  Then the panic set in, how on EARTH was I going to do the sleeves.  I decided to read the pattern more carefully - knit them separately and then attach them.  Knit, separately, attach.  Oh.


The sleeves themselves went pretty well.  I used the wrong increase though, but after consulting my lovely Instagram followers, they all loved the symmetry and extra detail so I decided to stick to using the K1fb increase :)

It took about 3-4 attempts to get the sleeves onto the body.  I googled it and asked for advice from one of my Instagram ladies who was also doing a bottom up - but all of the advice was for attaching to knit row, I had to attach to a purl row :/  The first couple times, no matter how much I tried to plan, I always attached them upside down!  I eventually got it right however, phew!


Then came the fairisle! I have to say, it was a lot easier than attaching the sleeves to the body, in fact it was pretty fun!


Then the bottoms - I was looking forward to making these, only because I never thought I'd ever make knitted bottoms.  These were pretty straightforward and actually uneventful!


I had a great time with this project and I loved making these!  I got to practice fairisle knitting and make little knitted trousers! :)  I'd definitely put these patterns in the 'to make again' pile!

Pattern links:
Cardigan - http://www.garnstudio.com/lang/us/pattern.php?id=4564&lang=us
Trousers/Pants - http://www.garnstudio.com/lang/us/pattern.php?id=4906&lang=us

Yarn Details:  Rico Design Baby Cotton Soft DK
Cardigan - Light Blue (Main Colour), Jeans, Beige, Silver.
Trousers/Pants - Jeans.

Tuesday, 25 February 2014

Knitted Headband


It was a work colleague's birthday last week and I didn't have any time the weekend before to go shopping to get her anything, I felt so awful!  But then I had a complete lightbulb moment - make something!  It's no secret that I love yarn and hoard great amounts of it.  I like to think that one day I'll have so much stash yarn that I could store it all in a big disused water tank and swim around in it all.  Like Scrooge McDuck from Duck Tales swimming around in his money.  Well, back to the story, I knew exactly which yarn I wanted to use, Debbie Bliss Cashmerino, it's definitely one of my favourite yarns!  I didn't have to look too hard to find a ball of aran weight and in a gorgeous red colour!

Anyway, my lovely work colleague loves knitted headbands, so making one for her would be perfect!  For inspiration, I went to my usual source, Ravelry.  I stumbled upon a pattern called Hot Mess Headband which was a really simple but gorgeous pattern; 1x1 rib with a cable in the centre.  Took me all of two evenings to complete, so super quick!  

Knitting skills save the day! And thankfully, my work colleague loved it :D

Wednesday, 12 February 2014

Baby Hat & Booties


It's been AGES since I last posted!  Life's been a bit crazy since my boy moved back to the UK.  For those of you who don't know, he's been living in LA since 2010 so it' crazy exciting that he's back!! It's just all starting to settle down now which means I have more time for crafting...woohoo!

To no surprise, another one of my friends had a baby last month and I went to see them on Monday.  I didn't have time to go shopping, so I had to frantically buy some yarn online hoping it would be supersoft and thankfully it was!  I ended up choosing Red Heart Soft Baby Steps which is 100% acrylic and aran weight. It is really soft and has a lovely sheen to it.

I searched for patterns on Ravelry for booties and a hat using aran/worsted weight yarn.  I decided on the Basic Beanie by Busy Mom Designs.  It looked like it needed a little something so I made a flower for it that I found through another pattern (click here for pattern).  It was super easy to make; I decided to use a 6mm/G hook so it crocheted up a little smaller with tighter stitches.

Next...the booties!  Having made the flower for the hat, I knew I had to put some on the booties too so they were all cute and matching!  The pattern I used for the booties were Cute Baby Boots Crochet Pattern by Teri Crews.  The flower I made up with a pretty simple design:

ch5, join with slip stitch.
*sc, ch1, 3dc, ch1, sc* in each stitch.

That's it!  I was really pleased with how these turned out.  I haven't made anything for a 0-3 month baby in such a long time that I forgot how teeny tiny they were!

Monday, 25 November 2013

Not Your Boyfriend's Sweater


I'm so excited about this...it's my first jumper that I can wear in public!  My first jumper was appalling, embarrassing even - the style of jumper I made was separate front and back panels and sleeves to be sewn together.  Some how I managed to knit the back panel SO loosely, but the tension for the other 3 pieces was fine.  When it came to sewing it all together it was so uneven that I gave up!

Undeterred, I set about knitting a second jumper.  This time I decided to do the raglan style, so completely seamless and no sewing together, hence less room for error!  I also found the straight stockinette in one colour of the first jumper soooo boring.  Instead of incorporating colour to jazz it up I decided to add detail in.

Now, I already had in mind what I wanted to do.  I'd seen a pattern yonks ago on Ravelry that has been saved in my favourites forever.  The pattern was called "Not Your Boyfriend's Sweater" and can also be found on the Cascade Yarns site.  It has the usual ribbed neckline and cuffs, but it has gorgeous lace details on the front and the back.  I had never tried knitting a lace pattern before so I thought I'd give it a go - it couldn't have turned out any worse than my first jumper attempt!

The yarn I decided to use was Calmer by Rowan.  It's a sumptuous cotton and acrylic mix yarn which I had bought from John Lewis as it was on sale (can someone say 'yarn addict'?!).  Then I found out it was on sale because it had been discontinued, such a shame as it's such a lovely yarn to work with.  It was also the same weight as the required yarn in the pattern which was extremely handy :)

The incorporation of the lace pattern made knitting this so fun, so much better than the monotony of a plain stockinette.  I did a practice swatch of the lace repeats before I got to that part in the pattern and I have to say it was definitely not as scary as I thought; in fact it made me happy making something quite pretty :)


Overall the jumper took a little over two months to make.  "But that's AGES!" you're probably thinking, and yes, you'd be correct.  However, this was done in the little spare time that in between working, flat hunting. packing, moving, extreme knitting a rug and my boy coming to visit for 2 weeks...I think if I didn't have that much on it wouldn't have taken that long at all.  Using worsted weight with 5mm needles meant that it knitted up fairly quickly.


I did also make an annoying mistake which I've left in there to remind me to be extra careful knitting whilst under the influence!  Fruity flavoured Swedish cider is so deceiving :(


I am so pleased with how this jumper came out!  I highly recommend this pattern to anyone new to knitting jumpers and wants something a bit fancier.  I would say you do need to have practiced or have experience with circular needles and DPN's (double pointed needles) - and if you do, great, you'll love making this!


Tuesday, 5 November 2013

WIP Update


Just realised it's been over a month since I last posted!!  It's been such a mad few months that I've not had that much time to knit or crochet.  Since August, I've moved into an unfurnished flat that I'm still buying furniture for, had my 30th birthday, my boy came over for a 2 week visit and now we're planning for his big move back to the UK!

I've been working on this sweater since the end of August...progress has been slow but I'm almost there, just a sleeve and the neckline ribbing to go!

I am planning to make some cute little Christmas decorations once the jumper is finished.  Things have calmed down a bit now so hopefully I'll have more time for crafting and blogging! :)


Saturday, 28 September 2013

Extreme Knitting: Rug Edition


I've just moved into a new and unfurnished place. Although it was a NIGHTMARE getting the furniture for it, I did have a bit of fun with decorating :)

Whenever I'd browse online yarn shops, I had occasionally come across huge and gigantic knitting needles and always thought "those would be so cool to try out one day" but I never had a project in mind to warrant using them. So when I realised my flat needed a rug I had a lightbulb moment - knit a rug!

I put a lot of thought into planning this - it would be nice to have a durable material that was easy to maintain and wash if needed so I settled on using tshirt yarn. I was originally going to make my own yarn from buying tshirts in bulk from eBay. But I couldn't find the colour I wanted and dying it myself was looking like a necessity. I ended up googling 'orange tshirt yarn' and found this amazing site called Hooplayarn that sold cotton jersey tshirt yarn on bobbins in millions of colours (okay not millions but definitely over 30).  I didn't want the orange to be too garish so I ended up going for a colour called Sunset, which made sound a but romantic too:) They seemed a little pricey, £8.50 for a 100m bobbin, but when I calculated how many tshirts I needed to buy to get 100m it turned out to be more expensive, plus I wouldn't have to dye it myself! I wasn't sure how many bobbins I needed so I just ordered 10 and figured I could order more if I needed to.


Next step, the huge needles! The tshirt yarn was designed to be used with 10mm needles or hooks. I came across a few, but the ones by Rachel John seemed to be what I was looking for. The extreme knitting needles came in either 19mm or 24mm. I decided on the 19mm, that way I could easily double up on the bobbins and the stitches would still look tight. I kinda wanted to do a cable knit too so I bought the straight 19mmx700mm needles and the 19mmx400mm cable needles!


As you can see from the picture, there isn't a cable. This is because I was silly and didn't think it through, what was the point of a cable if there's going to be a coffee table on top of the rug?! Doh!

Next came the actual knitting! Me being on the petite side found using these ridiculously large needles a challenge, but I love challenges! I cast on 65 stitches and just worked a stockinette until I got the length I wanted. It was easy to begin with, but as it got longer turning the work over got harder. I even had to sit on the floor as the work was too heavy to try and hold up doing it sitting on a chair or sofa! But turning heavy work meant a good arm work out, I should start selling tickets to my gun show now!


Et voila, here is my work in all orangey and extreme knitting wonder. It ended up being 100cmx150cm (101x152 to be exact!). I'm pretty darned pleased with how it came out.  I might even use the left over yarn to make coordinating coasters!


Friday, 6 September 2013

...Said no knitter, ever.

I just saw this amazing post on Facebook shared by Vogue Knitting.

My favourite line: "I love weaving in ends, the more the merrier."  Hahahahaha (weaving in ends is the WORST!)


Wednesday, 21 August 2013

Pink Baby Cardigan!


A few weeks ago, a friend of mine commissioned me to make her BFF a baby cardigan who is expecting her little bundle of joy in October.  The only pre-requisite is that it had to be some shade of pink!

I've never been given such artistic freedom for a commissioned project and so I emailed my friend like a fiend of cardigan pics and yarn types.  We soon decided on the 'Baby Sophisticate' pattern that I found on Ravelry for free, and to use Rowan's All Seasons Cotton in Cosmos.

The actual knitting went along quite nicely, because the yarn is aran weight, I managed to do the body in one weekend!  I've been using 4 ply a lot recently so I forgot how big a piece gets so quickly with aran!  Plus it was nice to hold some chunky needles and yarn.


The one bit I had trouble with was picking up on the right side, I kept getting this weird flat bit and frogged it about 2 times but with no improvement, other than that I'm pretty pleased with the result - so was the yummy mummy that I made this for :)


Monday, 29 July 2013

I'm still here!

Hey readers!

Sorry I haven't really posted in a while, just had loads of stuff happening which has cut into my knitting time :(  I'm still working on a sweater that I started over a month ago, good news is that I'm on the last sleeve, yay!

I've also got a few other projects lined up - hopefully I'll be able to get more knitting time in soon so I can start posting about my projects!

Bye for now!
=^.^=

Thursday, 4 July 2013

I just blue Tobias Fünke


Tobias Fünke.  Everyone's favourite blue never nude.  

This was a pretty esoteric project and only those of you who watch Arrested Development will understand why this man is blue and wearing cutoffs!

It was my boy's birthday a few weeks ago and I was struggling to find him a present.  The man has everything he wants and doesn't need anything.  So I thought of everything that he liked and Arrested Development - specifically a blue Tobias Fünke - sprang to mind.  *Internal monologue* "How awesome would it be to make him a little Tobias?!"  And so my next project was decided.

I didn't have to look too far for some blue yarn.  I had some left over from a vest that I'd made for my Mum a couple of months ago, it's handy being a yarn hoarder!

I wanted to make a moveable Tobias, so he could do awesome poses for the camera (as the one above).  So as I was making the doll I had to keep in mind that I'd be putting in a wire skeleton inside.  I decided to start with the legs, join them together, continue and continue into body and up to the shoulders.  Along the way I inserted the wire and put stuffing in.  I went onto the neck, made the head and arms separately then sewed them all together.  Next came the fun bit...making the cut offs!!


I needed an old pair of jeans for the cut offs so visited a few charity shops for a cheap pair.  I wasn't too successful, but then I saw a Cancer Research shop and OMG THEY WERE HAVING A FIRE....sale.  Well, kinda, they had a section where everything was £1 which was pretty cool as they had a pair of jeans in the exact shade I wanted and the hem was already frayed!

I fashioned a pattern for the cutoffs using ordinary paper and sewed it all together, it was such a perfect fit that they stayed up by themselves!  Then I made him some glasses out of wire and embroidered hair, eyebrows and a moustache.  I tried doing some eyes and a mouth but it just made him look a demented so I decided to omit those in the end.  


Seeing as I had a less than a week to make Tobias, I think I did a pretty good job.  It could have been better if I had more time to think it through, but I'm still pleased with him :)


Sunday, 16 June 2013

Father's Day Tie!


My Dad is impossible to buy for.  He's they typical Dad that says "Oh, I don't need anything, I have everything that I want."  Sweet but so frustrating!  He also likes to dress pretty dapper with jumpers matching his socks.  Naturally then he has a jumper in every single colour possible and endless ties and cufflinks.  This is why my Dad is impossible to buy for.

But wait, hang on, a knitted tie...my Dad doesn't have a knitted tie!!  Hurrah!  Present problem solved!

I decided that I wanted a 100% silk yarn, ideally 4 ply, to make it from.  Unfortunately, internet searching and a visit to John Lewis revealed that 4 plys were all silk mixes.  The only 100% silk I found was Debbie Bliss Luxury Silk DK.  Yup, double knit.  This would have to do and I just used smaller needles to cast on with.  The recommended size was 4mm so I used 3.25mm so the stitches came up smaller.  There wasn't really a pattern either, 12 stitches wide in a seed/moss stitch.  A stockinette would have just curled up at the edges and not looked very nice.  Using the whole 50g skein, the tie measured up as 53" long.  I had wanted it to be 58" as most of his ties were this length :(

I decided to let my Dad be the judge of the length and thankfully he said it was fine!

So here's the tie that I made for my awesome Dad!

Saturday, 15 June 2013

Frogging Advice

You may know that I currently working on a jumper...annoyingly the pattern was unclear for the front shoulders and I messed up a little and ended up a few rows short.  Having realised my error, I didn't have the heart to rip (or frog) my work as there were about 10 rows to undo and so I've left it as it is :(

A few days later I came across THE most helpful article ever!  How to undo multiple rows without laboriously doing it stitch by stitch, I wish I'd known about this article earlier!

Anyway, I'm sharing it with you all as it's pretty darned useful stuff...enjoy!

Saturday, 18 May 2013

A Rosy Intarsia Foray


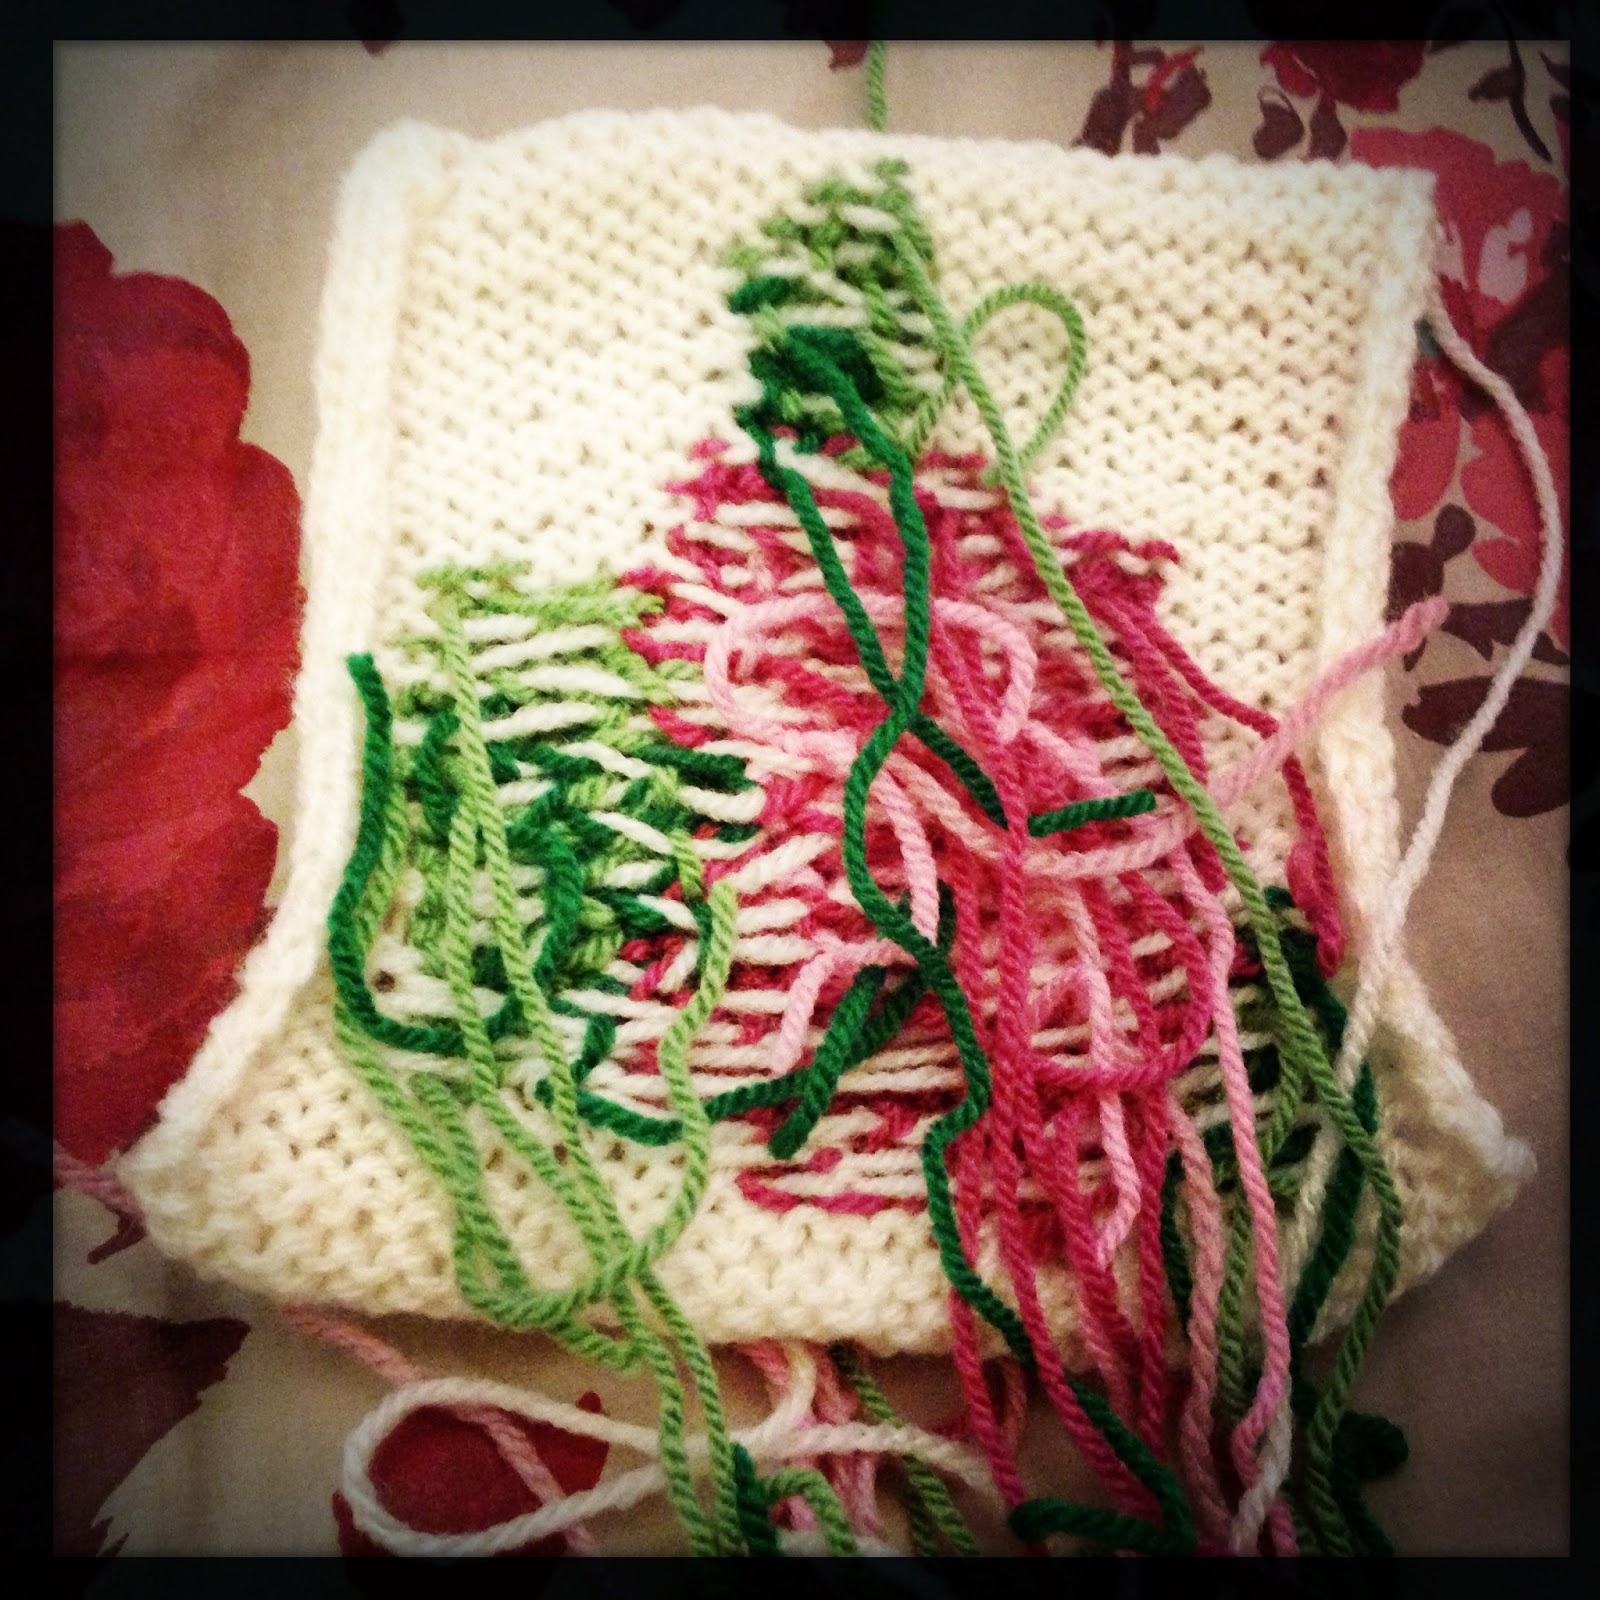
I took a break from my current wip (a baby pink jumper) to practice some colour work for the first time.

I recently posted about a jumper that I'm currently obsessed with making called "Santorini" by Rowan.  It's so amazing, but does require some pretty detailed intarsia work, which frankly, was way out of my knitting capabilities.  But I really want to make it so I've decided to do some practicing.

I found a really cute (free) pattern on Ravelry for a 5 colour intarsia chart which I thought would be perfect.  Luckily, being the yarn hoarder that I am, I already had 3 different pinks and 2 different greens.

I did a little bit of research and everywhere said that I had to use little bobbins which had a little bit of yarn from each colour of the pattern.  I didn't have any so I went all A-Team like and made my own from a bit of stiff card.


At the time, I had posted a pic of the bobbins and chart to instagram.  I was already 10 rows into it and finding the tangled mess of yarns a bit tedious.  A lovely lady (who is also going to be my knitting partner when I knit Santorini) told me she'd watch a tutorial once and they recommended just using short bits of yarn rather than bobbins.  I tried this and wow, it was sooo much easier!  I definitely would have struggled later on if I'd stuck with the bobbins!


After a few hours, I'd completed the little 30x40 chart.  Lots of lessons learnt and techniques discovered about intarsia knitting.  I got told once that you can carry the main yarn every couple of stitches so you don't have a huge bit at the back once you get to the other side.  Of course in the beginning I either 1. forgot or 2. didn't leave it slack enough.  By the end I'd got the hang of it pretty well.  It didn't stop the back looking like a hot mess though.


I was pretty pleased with how it all turned out, it's looks so pretty!  By no means perfect, but I think it's a pretty good first try at intarsia knitting :)


Monday, 13 May 2013

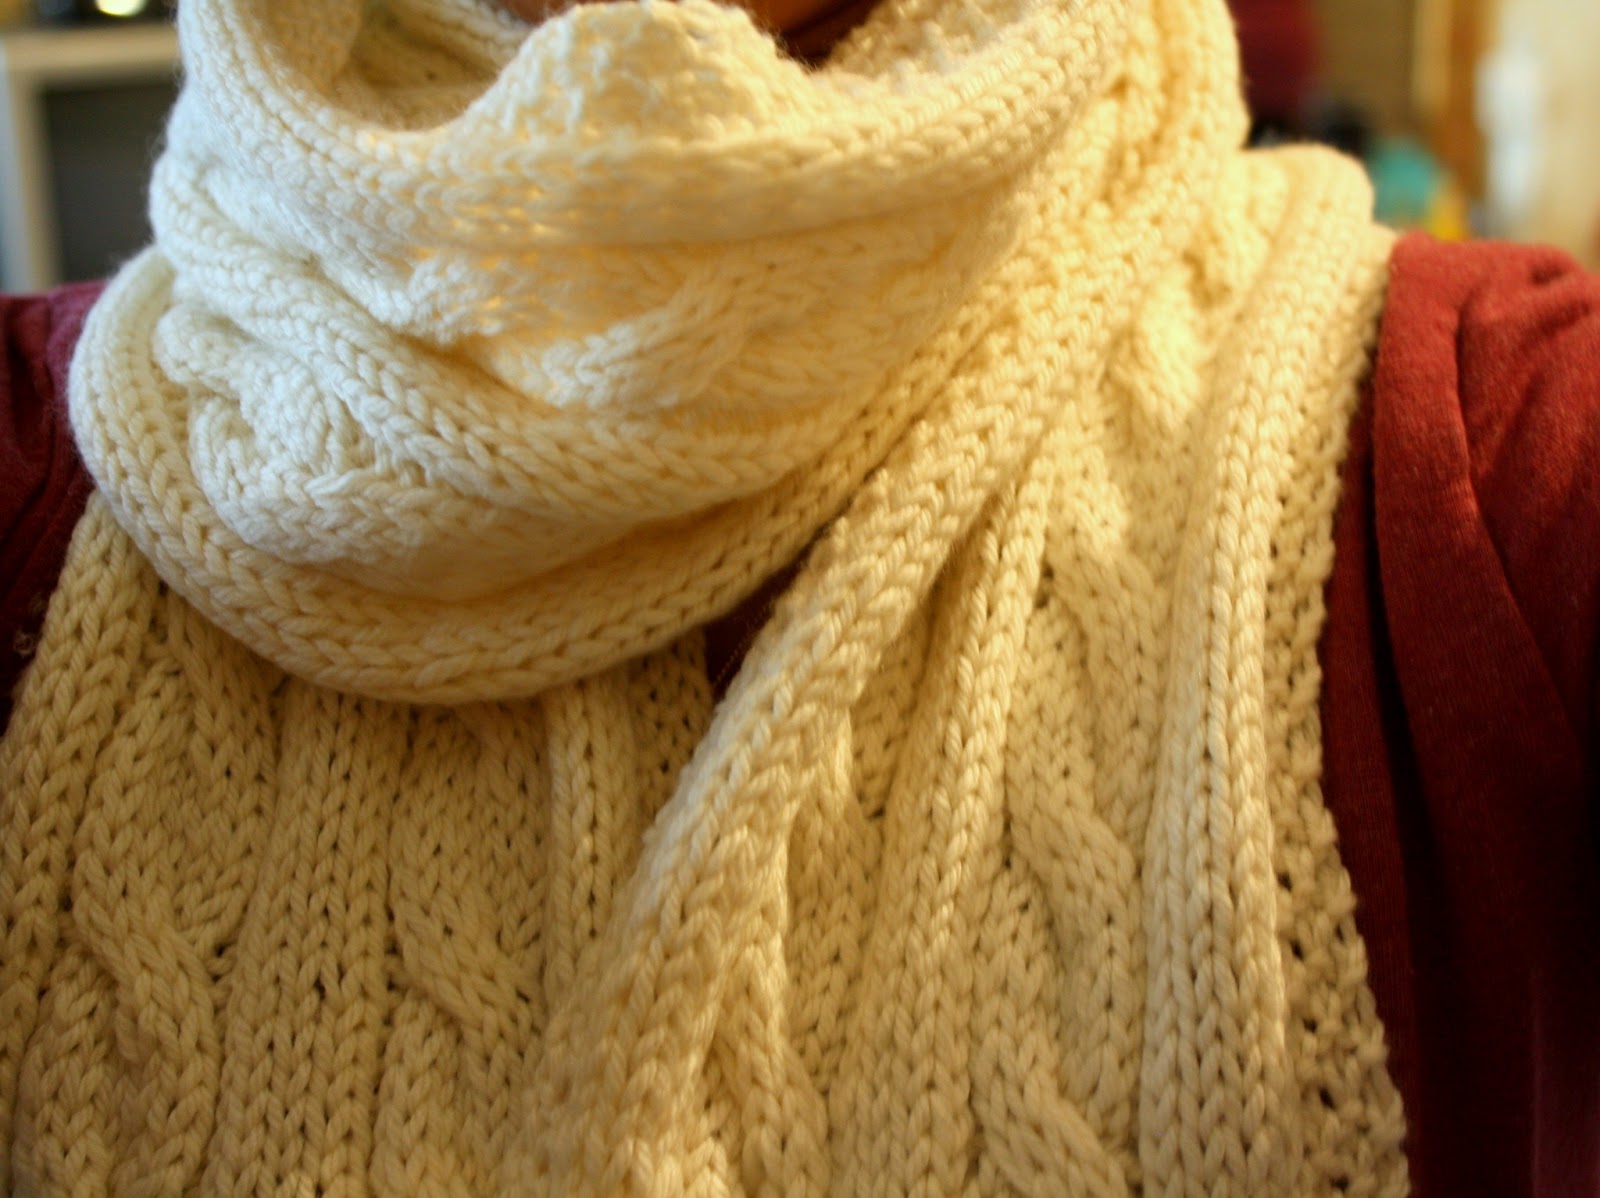
Cabled Scarf


I made this scarf for a good friend of mine who had requested it for her birthday.  Unfortunately I was a little bit late as her birthday was in the first week of April and I only finished it yesterday :/

All she said she wanted was a knitted scarf in a neutral colour - she's got a few winter coats in different colours and so we thought that cream would be best.  Other than that I had complete artistic freedom (which is a lot harder than having a straight pattern to follow!).  I suggested a few designs and settled on a cabled scarf broken up with bits of stockinette and a seed stitch border.  Pretty simple.

I used Debbie Bliss's Casmerino Aran, I absolutely adore this yarn, it's a dream to work with and is so soft against the skin.  

I haven't seen her to give it to her yet, but hopefully she'll love it :)


Friday, 10 May 2013

Santorini


No, not the idyllic holiday destination in Greece. Instead, this amazingly gorgeous drool-worthy jumper pattern in Rowan's latest knitting and crochet magazine (Number 53). I saw the picture on their website and completely fell in love with it. So much so, I went out and bought the magazine with no real intention of making it - but to perve over the pictures like a teenage boy reading Playboy. The more I looked, the more I had to have it. And when a particular online yarn store had a 15% discount on all Rowan yarns, I took this as a sign to make it. 

Only a couple of minor problems though:
1. I've never knitted an adult jumper before. 
2. I've only ever done basic intarsia with two colours. 

As you can see this particular jumper has about 20 bazillion colours, so one may say I need more experience. 

Experience, schmexperience. 

When I took up running I went straight in for a full marathon and totally disregarded any 5k, 10k or half marathons. No really, that's what I really did. 

So, I'm gonna do it. But seeing as the yarn was pretty darned expensive, I'm going to at least do a practice adult jumper. Just a basic, plain stockinette stitch but just so I know I can at least do that. Then maybe practice a swatch or two of intarsia charts involving more than two colours. Then I'll be ready. 

Santorini, here I come. 

Monday, 22 April 2013

Braided Necklace


It was my sister-in-laws sister's birthday back in February.  I was really rubbish and abroad for her birthday...I managed to send a card but then completely forgot to get her a gift when I got back, now she's having a belated party, uh oh!!

I racked my brains for something to get her.  She literally just started a jewellery making course this weekend gone and so I thought I'd buy her a book.  Seemed good but had this niggling feeling that it wasn't quite enough.  So I did what I usually do when I need some inspiration - browse the patterns on Ravelry!  After a couple of minutes I came across this pattern (click here) for this gorgeous yet simple necklace design, and seeing as I only had a week to make this, it would be perfect!

I started it late last night and managed to finish it today, button and weaving ends in included!  It's so pretty and perfect for the summer.  Also, hopefully something quirky enough to tie in with her jewellery making course :)

PS I used the 'projects' bit on my Ravelry page for the first time ever for this necklace! If you're interested you can read it here.


Saturday, 13 April 2013

Granny Square Baby Blanket


First of all, I can't believe it's been almost two months since my last post :/  This year is going WAY too quickly for my liking!  I have been fairly busy too and I've not had as much time for my yarn creations as I would have liked but I've managed to find some time for it!

I've got another friend who's currently got a bump and her baby shower was today!

I decided to make her a blanket.  So I put my thinking cap on...hmmm, I've never made a granny square anything...hmmm what if I made a granny square blanket?!  Genius!!

I've never even made a little square for a blanket let alone one huge square that would be a blanket in itself!  So I found a pattern on Ravelry by Lion Brand Yarn.  I ordered the yarn and seeing as I had a long return  journey to the Philippines the following week (18 hours in total; 12 hours, 2 hour stop over, 3.5 hour connecting flight) I thought it the perfect opportunity to kill that flying time.

I loved the airplane seats on Singapore airlines, as well as the main pocket there were little ones on the front of it which came in handy as little yarn holders!


That's all the background story - after lovingly doing double crochet after double crochet I finally finished it!  I just hope my friend and her ickle baby boy like it :)